Yes, It’s really been more than two years since I’ve posted here. It seems that the effort to make a pretty post here (often with a video) isn’t happening. When I have the energy, I’d rather put it toward the project directly.
Good News! The new Orly Blue Stretch is making great progress again, and I have a LRAWD Model 3 to put under it.
I’ve set up a new Twitter account where I hope to post many quick and easy updates. Please follow the project there and hopefully I’ll be more diligent at keeping you all in the loop.
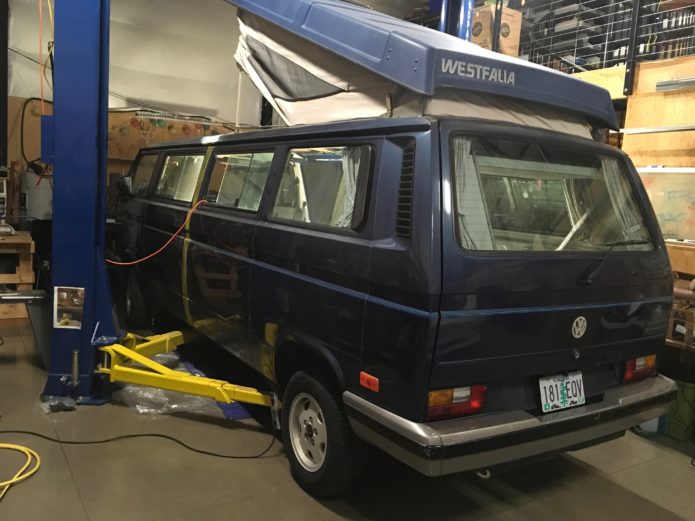
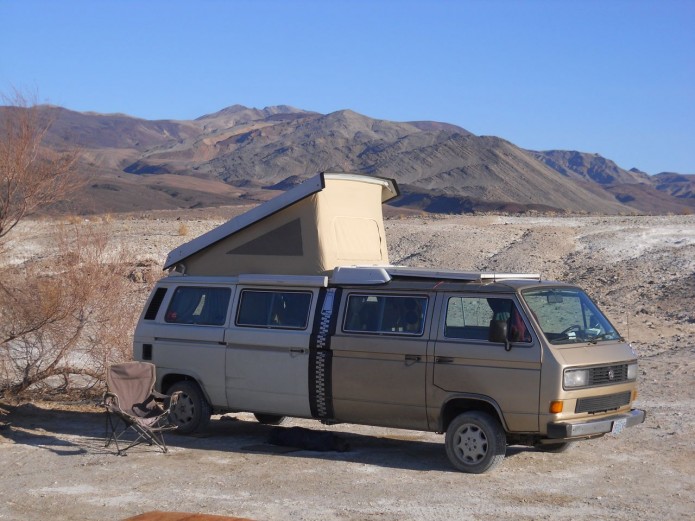
From the day I came home from the hospital in the my family’s 1965 Transporter as a newborn, to what is now my second Stretch bus (a Vanagon Westfalia this time) I’ve travelled and camped in many VW busses. I can’t begin to count the number of times my family took the old green bus camping. I bought my first bus in high school. It was also a ’65 Splittie and waited less than a year before I grafted in the frame and drivetrain from a wrecked ’78 loaf. Modifications seem to be one of my favorite creative outlets.
EV’s
Electric vehicles came early as well. Living in Palo Alto I was lucky to have two engineers working on EV’s within a few blocks of my house. At the age of twelve I used their advice to convert my wooden go cart to electric propulsion. It was quite a sight. Surplus lawn mower wheels wobbled, old rope connected to a wooden steering wheel through a broomstick handle gave approximate direction control and the Delco generator wired as a shunt motor had adjustable field and electric reverse. Speed control was courtesy of the guts from a model train transformer. As with most of my EV’s it was a bit too fast to be safe, and it was fun! So naturally I would want to combine my love of VW camping with electric vehicles.
Electric Camping
Many discussions around the campfire were spent speculating on the possibilities of electric camping. Last spring I took my first electric camping trip in my electric 914 with a tent. But EV’s have this one problem, long recharge times have kept them incompatible with road trips. In the past you could drive maybe 100 miles in your EV and then find a place to charge for many hours, it meant a road trip would take extra days with long stops in less than ideal places. Then Tesla changed all that.
Superchargers change the game
In 2012 Tesla announced a true game changing technology; the Supercharger network. At 120 kW charge rate a long range EV can now get half a charge in 20 minutes, that’s on a 260 mile range 85 kWh car. I know I wouldn’t mind stopping for a 20 minute break every few hours on a road trip. This new network makes my long held dream of electric camping possible. Tesla Superchargers are wonderful and keep getting better. They are free to use if you own a Model S, fast and rapidly expanding across the country. They are owned by Tesla and the interface is proprietary. This means they only work on one car, the Tesla Model S. My problem is that the Model S is a bit small to be my favorite camping vehicle and I don’t see a bus in the Tesla roadmap.
The idea takes shape
It was last spring when the Stretchla project started to take shape. It all started when the young TDI engine in the Stretch threw a connecting rod through the block while returning home from California on I5, ironically it happened not long after I passed a car carrier full of new Teslas heading north for delivery. The thought of buying another internal combustion engine and spending a greasy week installing it was depressing to me. I parked the Stretch in the yard. Later I was camping in my electric 914 when my friend Jon suggested converting the Stretch to electric power. After all, he reasoned, most of the camping was within 100 miles and many campsites have power for charging. He was right, but that wasn’t going to get me from my home in Oregon to my favorite winter camping in Death Valley. At some point I noticed that Tesla was planning to put a Supercharger station just outside of Death Valley on Hwy 395. If I could only get the Stretch to plug into Superchargers I’d have it made. As far as I know Tesla has no interest in letting other EV’s use the Supercharger network. I don’t blame them and I didn’t even ask, building the network is a huge investment and a super sales tool for the Model S. If I wanted to use the Supercharger network, I figured I’d have to pay the cost of entry of buying a Tesla Model S. I’m sure you can all see where this is headed now. I love VW bus camping, EV’s and modifying cars. It’s simple really, I’ll buy a Tesla Model S and graft it onto the bottom of the Stretch. Sure the Vanagon brick-like aerodynamics will give less range and efficiency than the slick Model S, but I’ll get a powerful electric drive system with a huge battery, free Supercharging and an amazing dashboard to boot.
Moving forward
No, it won’t be easy. So far it looks like the most difficult modification I’ve attempted. Since it would be a waste to hack up a new Model S for this project I’ve been scouring the insurance auto auctions for a wreck that I can use for parts. I ended up with Vin# 07822. It has almost all the options I would have chosen. For those of you who speak Tesla those are: 2013, 85kWh, Active Air, Tech, Pano, 19″, Obeche, Black Leather and Jump Seats. The only additional option I would have liked is the dual chargers. Clearly it will need some replacement suspension parts in the front as well. As I write this it’s heading here on a truck from New York and I expect it to arrive in about a week.
Here is a quick update to keep you all in the loop. It’s late and I need to be up early for the transport delivery so ‘ll warn you now that you may find a few typos here.
I hear that my Tesla was on a truck in Seattle today and is supposed to be delivered tomorrow (Tuesday) morning. I’m excited to get it! Of course I haven’t been completely idle waiting for it to get here. I ordered and received a Tesla Universal Mobile Connector so I can charge it as soon as it arrives. I’m still awaiting the Tesla jacket I ordered but I’m glad they shipped the important things first. I also got the extra key and the J1772 adaptor from the previous owner. Thanks Joe!
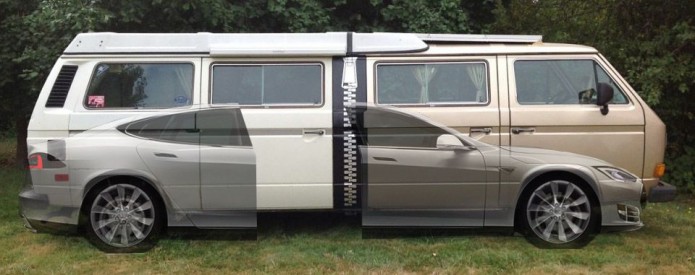
I’ve been doing rough planning for the last few months. One of the critical dimensions involves fitting the almost 28″ tall Tesla tires under the Vanagon front end without jacking the van up higher than it already is. I’d prefer it to be lower to match the lost ground clearance. The Stretch had Syncro (4WD) suspension with a low of 9″ of clearance while the Tesla I measured on the “Very High” setting was 6″. I also hope to avoid having the top of the front suspension strut higher than the bottom of the front seats, as that could get rather uncomfortable. I’ve attached an image that I made to check out how it may fit (above). Being low tech at times like this I just printed up scaled photos of the two vehicles, cut the Tesla one in half and put them on a small light box that was handy. So far it looks good, but it’s going to be tight. I’ll take a long look at the rear brakes when the Tesla gets here to see if there is any way to drop the wheel size down to 18″. In that case I might use use a 245/45-18 like the Conti PureContact with an OD of 26.7″ allowing the whole Tesla pan to sit higher in the van. I’m trying to avoid any lower profile sidewalls since even these are pushing it for the rocky dirt roads that the Stretch likes to visit.
Yesterday Tony and Brandon came down from Portland to pull the TDI engine and Porsche transaxle from the Stretch. Tony has plans for them in his own Westfalia and I’m happy to have them out of the way. Since mine was running well before it threw a rod, with all the wiring, intercooler and custom transmission mounts it should give him a good head start on his project. I’ve been preheating the floor of the Garage Mahal just for this event and I’m glad I did since we’ve had record cold and snow buildup here in Corvallis. The attached 3 minute video covers about 7 hours of work.
That’s it for now,
-Otmar
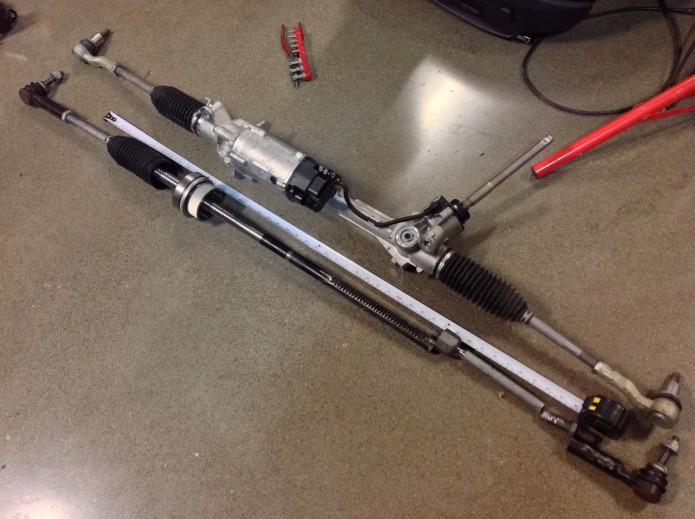
Tesla Parts, Copyright Otmar Ebenhoech
Roads to my Favorite Places, Copyright Otmar Ebenhoech
Washboard for miles on end. Copyright Otmar Ebenhoech
Yesterday at 8 AM I got a call from the carrier, my Tesla was on the way and should show up by 11. I must admit to being nervous. Everyone I spoke with about auto transport had stories of trouble; missed dates are common as are damaged vehicles which they claim were damaged when picked up. The shipper assigned to me had a BBB “F” rating and I noticed them being dishonest with me the first time I called them. Let me be very clear so no one gets the wrong idea, Tesla had nothing to do with this, it was organized by a broker that works with the insurance auctions. Thanks to warnings from others I paid my deposit at the time of order placement but withheld the bulk of the payment as COD. This seems to motivate them to actually deliver the car. In the end my Tesla showed up only a week late and aside from the missing key and lots of dirt from a cross country trip in the winter it seemed no worse for wear since it left the auction in New York. The battery pack, that most critical part, had a few new scratches but they were very minor and no worse than the ones caused during the initial accident. It seems they had been sliding the car on and off carriers with the parking brake on, clearly they had not studied how to turn the brake off (admittedly a challenging feat) . A call to the auction yard verified they had record of the key being picked up by the shipper with the car, contrary to the claims of the shipper and in the end we agreed that I would withhold the cost of a replacement key from the COD amount until they could produce the key. I suspect that I’ll never hear from them again. Most fortunately I had a second key that I had bought from the previous owner and so I was able to jump the 12V and unlock the parking brake to help it off the last truck. Many thanks to Arthur for arriving just in time to help me push the Tesla around and get it on the lift.
Damage Assessment
I’ve spent much of the last two days assessing damage from the accident. I’ve worked with a number of wrecked cars over the years, but this is my first aluminum one and I am very impressed with how it responded to the impact. I’ve worked with steel cars and aluminum parts before, but somehow it never really sunk in how well aluminum absorbs energy until I reviewed this wreck in detail. Of course aluminum by itself would do little without the impressive engineering that clearly went into the Model S design. The down side of the aluminum is that more of the front suspension is damaged than I had hoped and the old steel tricks of pulling it back in place and welding it up will not be appropriate. That’s a small price to pay for the well-being of the occupant. The subframe and upper frame have both been damaged. The electric power steering rack is broken off its mounts. I have a copy of the original parts cost estimate for the repair. Including body panels (which I won’t be needing) and not including a battery the total is about $29K. This does not include some other parts I’ve found damaged. Parts like the $3000 steering rack do give me pause. I’ll either need to find a creative way to fix it, find someone parting out a Tesla (I haven’t found anyone yet) or save up for new parts. It seems I get to work on my issues with “luxury car sticker shock”. 🙂
Next Step
My next step is to get the system happy enough that I can activate the HV (high voltage) system, check and charge the main battery and see that the drive motor engages. Pulling panels and inspecting parts is providing a fun education, I’m on the steep part of the learning curve for now. I’ve found that someone completely removed the “First responder loop” that normally would just be cut. This wire has one wire loop to disconnect the SRS and another that shuts off the HV battery system. It’s not surprising the car won’t drive or charge without it. The first responder loop consists of 2 wires with each shorting 2 pins on a 4 pin connector. With my service center being a 3 hour round trip away I was trying to figure out the wiring so I could jump it until I get a new cable. With no service manual or wiring diagram available to the public (at least that’s seems to be the case for now) it’s certainly a challenge. I’ve traced one of the 4 terminals, but am still pulling panels to try to trace the others so I can be sure of the functions. In the meantime, while I’m trying to find replacement parts for something less than full retail price I’ll work on fixing subsystems and hopefully whittle away at the 10 to 12 error messages usually on the screen. There’s everything from “windshield washer low” to “Needs service contact Tesla”. Mostly they have to do with much fluid being lost in the wreck . Speaking of errors, that never ending triple beep that plays anytime I’m in the car is getting a bit old. In the old days you’d just reach up under the dash and pull what was vibrating, but we live in a new world. I’ve also found that it’s hard to do anything inside without turning the car on. Once I tried to manually open the door with the key far way and the darn alarm went off, dual horns bouncing off the shop walls. I’m no fan of alarms and hope I can disable this one someday. I can power the car down on the center screen and as soon as I get out it turns back on. It seems the only way to get quiet time while I’m inside is to disconnect the 12v battery. No doubt about it, this car is very modern! Reviewing the forums I find there are many operational tricks I have yet to learn, maybe making it stay shut down and quiet is one of those.
Planning
Remember that musing I had about dropping down to 18″ wheels in my last post? As with so many things early in the planning process, it was pure fantasy. One look at the steering knuckle, still connected to the loose wheel, shows that there is no way a smaller wheel is going to clear on the front, no matter what the brake caliper clearance is. I’ve put up a WTB post for a used wheel and tire (or two) on the TeslaMotorsClub Forum. On the plus side, the sunroof works very well and looks like it certainly could fit the Vanagon roof, helping with an aerodynamic transition to the pop top height. It’s a beauty! Here is a short time lapse of the arrival and a few pictures of the car and the damage.
After a few days trying to get the Model S high voltage system to wake up, I pull the rear covers and find that the shop that did the initial estimate taped over the battery connections and didn’t plug it in. I guess that would be the safest thing to do. It’s time I learn to drop the pack! 🙂
Before I start dismantling the Tesla and transferring parts to the Stretched Vanagon, I want to insure that all the Model S systems are working correctly. The condition of the battery, being the most expensive component in the car, has been of great concern to me. I wasn’t expecting much difficulty in getting it to wake up, charge and drive but things are often not as I expect. The Tesla is very new, and so far there is precious little public diagnostic information. The simple fact that a pyrotechnic disconnect on the 12V battery controls power to the contactors for the main traction pack was unknown to me, though in retrospect it makes perfect sense. I do appreciate the fact that doing things the hard way often entails more learning, and I’m certainly learning many obscure details about the Model S! It’s a good thing I enjoy learning about this sort of thing.
For this update I tried my hand at making a video blog entry, partially since so many people on Youtube were lacking context for my earlier time lapse videos and also to learn to use some new media tools. So here is the update:
Do I hunt for a better deal, or make progress faster? That is often the question with a project like this one.
You may think that money is not an issue for someone who can afford to buy a Tesla, but we all have our limits and this project has been one to push my comfort zone. I suppose that that’s part of what makes it all interesting as well. I find it rather amusing to watch my initial resistance and then my justifications for spending funds along the way. Much of my life I’ve been concerned with money and here I’m strangely driven toward a large optional expenditure. It’s not like I’m concerned about making rent or food budget here, I’m very fortunate in that way these days, but this does involve what I would call considerable sums from what most people would suggest I’d do better to save for retirement.
It all started with getting the Tesla base vehicle. Six months ago when I started this project my budget seemed simple. I’ll buy a totaled Model S for $18K or so (seems about right for a luxury wreck), throw in a few grand to get the essentials running and then it will take much labor but very little cash to merge it with the stretched Vanagon body. Not pocket change, but not bad at all for such a cool EV. Ah grasshopper, you have so much to learn. After losing a couple auctions with my low bidding limit I reconsidered my budget. Had I not justified $30K for a battery pack on the conversion project this replaced? And is not $10K a perfectly reasonable amount for a powerful drivetrain? What about the value of a huge panoramic sunroof? That practically essential tech package? Don’t I need a test bed for high power AC drives in order to further my business? That retirement fund isn’t earning much anyway and besides this is going to be fun! I’ll sell a few vehicles to help with the cash flow and free up some work space as well. Within a few weeks I had talked myself into a $40K bid limit. Not that I’d need that much, no, I’m sure I’ll get one for $30K. Did I mention how I used to teach “Creative Justification 101”? I waited and watched some more. A number of less than ideal auctions went by with issues, no air suspension, the smaller 60 kWh battery, $50K selling prices, those were not for me. After over three months of auction watching my car showed up. The damage was not too bad, it had almost every feature I wanted, lacking only the dual onboard chargers, and best of all the passenger air bags were all intact so the interior was perfect. Very nice! Not only that, the pre bid value closed at only $12,300. It’s not uncommon for the final bid amount to be twice the pre bid, but not often much more than that. I thought long and hard about my bid limits for this car the night before the auction deciding I would go as high as $38,200 but not to my $40K hard limit. If I didn’t get it for that then I’d accept it was “not meant to be”, thereby giving my guardian angels a vote. Either I have a lesson to learn about expecting a good deal, or my guardian angels have a great sense of humor because the other bidders stopped at $38K and I won it for $38,100. As I watched it bid to $38K I knew I had to mentally let go, and even when I “won” it, I had to wait for the insurance to approve the sale since they had a $40K reserve, but I held tight and still won it. In the end auction fees, broker fees and shipping brought it to $42K.
$42K for a totaled car. What-Had-I-Done!? Prior to this, my most expensive car was a new Prius for about half that, and this one was a severe wreck. I just had to laugh. It started as a nervous laugh but now that the car has been here almost a month I can really laugh about how nutty it seems. Oh well, I reserve the right to do nutty things when I can, I guess it reminds me I’m alive. I’m grateful to have this freedom. The Stretch project in 1998 felt similar. Back then the front half was also the most expensive car I had bought by a factor of two and I promptly cut it up. It feels a bit like I’m trying to cut up my mental blocks. But this is not the end of those.
I think I got over the cost of the donor car. I’m still working on adjusting to the cost of luxury car parts. The steering rack mounting ears were broken in the accident. This is not uncommon in a wreck so you just replace the rack. I’m well accustomed to old Volkswagen prices and I normally pause a bit before I spend a few hundred dollars on a steering rack, but $3066.60 for one? This pause it taking longer.
Now I have a choice, do I buy a new rack or try for some alternative fix? Buying new is quick but costly. Alternatives take more time, carry more risk of lost time and money but can have hidden benefits. As a child I wanted a new go-cart, it was there in the Sears catalog and it would have been so cool! But buying a new go-cart was not an option in my family and so I had plenty of time to ponder alternatives. Eventually I built a much more creative go cart for almost no money and learned how to build things along the way. I’m not vouching for its safety, but I survived and gained valuable skills. I would have preferred the easy path of a new go-cart at the time, but the financial limitations forced me toward an education that my friends from wealthy families missed.
Back to the steering rack. If the Tesla were a few years older I might buy one from a wrecking yard for under $1000, but as of today I have not found a single Model S being sold for parts. A friend suggested having it welded so I took it apart. Now this part was fun, I’d never taken apart a modern EPS rack. If you are as curious as I am about these you can read about them here: It’s the high end Paraxial Servo Unit on page 8 and 9. I didn’t find this document until I had it apart, so I had the joy of discovering the fine brushless motor and belt, the integrated torque sensor and even how to put a few errant balls back in the recirculating ball gear before reading about them. With it apart I was able to take the housing to the finest aluminum welder in the region. He said there was a good chance he could weld it up, but complications such as the proximity of precision surfaces and my desire to run it on a heavy vehicle had me agreeing with him to look into other fixes first and only consider welding as last resort. The rack is made by ZF Lenksystems and with help from friends and Google we’ve found the cast housing may be the same as the one on a 2012 right hand drive Land Rover Evoque. There seem to be more of those in the scrap yards than there are Teslas. There’s one on eBay in the UK for $327, I’m awaiting more details from the seller to see if the housing is the same so I could swap it. Maybe this will work, but I’m warming up my justifications in case it doesn’t.
The steering rack is just the most expensive part. My list of parts to get it rolling comes to $8000.61 and I’m sure I’m missing some things. Many of the smaller parts are clearly worth buying but the air strut at about $1800 has me looking for alternatives as well. Eventually I’ll either find a workaround or get tired of looking for alternatives and just spend the money. I don’t want to wait too long to order parts since I hear Tesla parts sometimes have long lead times.
I wanted to write this post to let you know that I’m still working on it, even if it feels like nothing is happening on the outside. It may take some time to adjust my comfort zone, but with some minor delays the Stretchla will make progress.
For those of you who prefer to read I’ll be covering:
The challenge of trying to save money on parts
Distractions from the project
Front suspension fit considerations
1) Parts:
I’m still working on the initial phase of getting the Model S running without error codes before moving parts to the Vanagon.
It feels a bit slow, but progress is being made. I’m expecting a used steering rack from a wrecked Land Rover Evoque to arrive soon. DHL got it earlier this week in the UK and it’s headed to Oregon. If it all works out then the $700 plus time invested will pay off. I’m hopeful that the Land Rover aluminum housing will work with the Tesla electronics parts, if not then that was just a learning experience and I may need to buy a new one after all.
I’m hoping to find a set of stock 19″ wheels with Michelin tires for a good price. I hear the Michelins have lower rolling resistance and I’m going to need every little bit to get near my target of 200 mile range. Lowell Simmons has helped a lot trying to get a set that I found online in his part of the country, but as of today the seller seems to have disappeared. Buying new parts may cost quite a bit more, but at least the suppliers are reliable. The adventure continues.
Do you have a friend at a Tesla approved body shop? I’m looking for damaged parts that they may be throwing away. I expect to modify these parts on the final conversion and so it seems a waste to buy them new when all I need is to make the electronic systems happy. Parts I no longer need are marked with an *. These are the parts that I think may be helpful:
Active louvers, all three. Wiring harness parts for them as well
* Left AC condenser and fan. It just needs to hold refrigerant pressure
* Left hose, pressure sensor and fan controller for above
Coolant radiator
Left headlight
Left side marker light would be cool too, but not that important
I’m also looking for these parts in good working condition. If you know of anyone parting out a Model S please let me know. I’ve posted pictures of some of these below. (edit: I’ve ordered all these parts new from Tesla)
* Left Steering knuckle
* Front Air Strut
* Lower control arms
* Brake line, Height sensor, Wheel speed sensor
If you have any leads on any of these parts, please let me know with a message here.
2) Other Distractions
As much as I’d like to spend all my time on this project, I’ve been working on some other good projects as well.
I designed the Zilla motor controller years ago and I’ve been working on experimental code allowing it to use a wide range of accelerator pedal inputs.
I’ve also been assisting Hai-Yue Han as he works on the Tri Zilla project. It’s all back-burner stuff since we don’t know if it has a business case, but the Tri Zilla has the potential to be a 1000 HP AC drive which is plenty of fun in itself. Initially we plan to run it in the Honda Insight with a GM EV-1 motor as a proof of concept, but someday we may put it in the Stretchla for higher power testing.
3) Front Suspension Layout
Several times I started on this update, and each time I’d feel I’d done so little on the project that soon I’d be measuring the front suspension since that’s as one of the difficult parts.
I intend to use the Tesla suspension and brakes for a number of reasons. I love the adjustable ride height and smooth ride of air suspension, especially on washboard dirt roads. The rated axle weight capacity is 808 lbs (367kg) higher on the Model S. The ventilated brakes and Brembo four piston calipers are huge, and the ABS system is required in order to safely allow regenerative braking.
The front suspension is a challenge since I am trying to optimize ground clearance and reduce aerodynamic drag all while avoiding raising the front seats. The front seats happen to be located directly over the front suspension on a Vanagon. I’ve been measuring every which way, and when I didn’t like the outcome I’d measure more and more accurately but it’s still a tight fit.
The Tesla front suspension looks like it was designed for excellent handling, light weight and a great ride but it was never intended to fit under the front seats in a VW van. The Tesla seats feel wonderful, but are also about 10mm taller from the mounting rails to the seating position than the VW seats. These things add up.
There are a couple of critical interference points in this mashup. The Tesla tires are almost 4″ larger diameter than the Vanagon tires and that puts an absolute limit on how low the VW body can sit since the top of the larger tire will rub inside the wheel well. The wheel well can’t be raised since it has a seat above it. But the more restrictive limit is that the height of the Tesla Suspension from the bottom of the lower control arm at the pivot (I’m assuming that I’ll make a new subframe) to the lowest clear area for the seat rail. This distance is about 665 mm. Ideally I wish it were closer to 610 mm and the extra 55 mm will have to extend under the car. This will reduce ground clearance while increasing aerodynamic drag. The alternative would mean making suspension pieces to some custom design which seems like a huge project in itself.
In this case I think I’ll accept the compromises and make it fit as best I can. I expect it will increase the frontal area of the van and therefore the air drag by about 5%. I can live with that even if it means I’ll have to perform some minor aerodynamic miracle to reach my range targets. I have friends from the OSU Solar Car Team with Aerodynamic modelling software and it looks like that optimization is going to be more important than ever. We’ll have to see what we can do to improve the efficiency. But most of that can wait until the Stretchla is up and running. I love the fact that the Model S displays energy use in Watt hours per mile, that will make it easy to quickly evaluate the effect of any modifications.
Thanks for following along, knowing that you enjoy hearing about it makes this blog worthwhile. Thanks to Nikki at Transport Evolved, it was fun to be on your show and I love your idea that we could all be wearing “i void warranties” shirts. Extra thanks to those of you who have contributed time and funds to help obtain the needed parts!
The Land Rover steering rack arrived from England and I have good news. It works!
I confirmed the width of the tie rods (the tie rod ends are clearly different) and guessed that the steering ratio and torque sensor would match up. I then swapped in the old brushless power steering motor since it’s programmed for the Tesla and tried it out. With the car on the lift, (no load) it feels normal so it looks like this was a success! I think it was fun to learn about the inside of the EPS system, but I’m also thankful I didn’t need to reassemble the old rack and pinion.
Cash saved: Almost $2500. Time spent: Many hours over the last month and a half. Was it worth it? Probably, who cares? It was fun. 🙂
btw: If you are looking for Model S parts like a -A 85 kWh battery, Drive unit and rear spring suspension, Charger, but not much in body parts from a 2012, let me know. There’s a salvage one I could get but it only has a few parts I need so it’s only going to be worthwhile to me if someone else can make use of the major parts.
I scored a beautiful almost new set of original 19″ wheels with Michelin tires from California. I prefer the Michelin tires over the Goodyears since they reportedly have lower rolling resistance. This should leave me with three extra wheels, two of which I can save as spares for backcountry desert roads and one I can sell to someone else who wants a spare.
I have not decided if I’ll integrate the back of the liftgate and taillights into the Stretchla, but if I do I now have a full set of taillights to fit. There was a slightly damaged new part on ebay that was a good deal. It replaces the one broken one I had which was missing the outer cover.
The most exciting time was travelling up to Portland for a Tesla pilgrimage. I grabbed John “Plasma Boy” Wayland as a sidekick since he’s always up for an adventure. We stopped by Precision Auto to check out the damage on Gary’s car (it doesn’t look too bad) and then headed over to the Tesla factory showroom. It was Plasma Boy’s first time at a Tesla showroom and he was duly impressed. I took a few more pictures of the chassis on display. I couldn’t ask for a better reference for my project. Here are the wheels, suspension and the lower part of the frame on display without any body parts in the way, it shows most of the parts I plan to reuse. I noticed something new this time, the radiator louvers were in place and I saw where the orphaned louver motor in my car was supposed to go. This also allowed me to determine the proper actuation angle which will help when spoofing them.
Next we stopped in at the tesla Service center. It was great to meet Jason and Emily who had been so helpful on the phone in the past. Emily and I sat down and went through my parts list to order everything that I still needed. It was helpful to be able to see the parts diagrams and add the nuts, washers and o-rings that I need. I know I’ve whined about Tesla parts cost in the past, and I still think the power steering unit is priced higher than comparable cars and the air strut is more than twice the cost of a MBZ part, but smaller parts were quite reasonable. Seeing that the left AC condenser and fan assembly cost only $299 new, (while people on ebay were trying to get $250 for damaged ones!) I decided to splurge and buy it and the fan controller ($180) as well. I also ordered up the front air strut assembly, knuckle, lower control arms and other small parts that need replacement. It felt easier to spend the money on the parts now. Either I’ve adjusted to the cost of new luxury car parts, gotten over my crazy expenditure on the original wreck, or maybe it just seemed silly to try to search for used parts when my TSLA stock was doing so well. It’s a relief that I no longer need to look for a wrecked car to find these parts used and I’m excited to get the car rolling soon. I forgot to ask when the ordered parts are expected, but I’ll be ready when they come in.
2) Seat Dissection:
I decided that the Tesla passenger seat would not be needed when testing the drivetrain. I’ve been concerned about the height of the seating position in the Vanagon regarding seat rail to suspension clearance so I decided to dissect the Tesla seat while checking out the options for modification. The seat seems pretty heavy at 57+ lbs, much of that is in the steel structure for the seat bottom motion controls. Since the Vanagon has an upright seating position I decided that I don’t need the base angle controls, later I’ll have to decide if I want to make fore/aft adjustment with seat rails. That would be a lot more work and I figure as long as I’m still single (or dating someone with compatible leg length) there’s no real need for adjustment. I can mount it to fit me and worry about other drivers later.
I removed the side bolster “pelvis?” airbag. I have no intention of using air bags in the Stretchla and I’d rather not carry around extra explosives. Maybe when I’ve removed all the air bags I can sell them to help restore some other damaged Model S.
The good news is that the controls I care about like the back angle and lumbar adjustments are easy to retain, and there is plenty of clear space to allow mounting the seat close over the air strut in the best seating position for comfort and visibility.
3) LIN Bus Louver hacking
One goal of this project is to go Supercharged camping soon. That goal is somewhat in conflict with the goal of learning new things. In the past I’ve resisted coming into the modern age of cars especially in such things as LIN and CAN bus communications. This project has given me a great excuse to get familiar with both of these protocols. I’m very fortunate that my friend Debbie Hollenback also enjoys learning new things and she is much better than I at composing C code. Together we’ve had fun working with the radiator louver system.
For those who wonder “why louvers”, it’s simple. Air drag in a vehicle is lower (Some ecomodders report 5% gain in fuel efficiency) when air is prevented from travelling through the radiator(s). Some modern cars like Tesla, with an eye toward efficiency, are implementing automatic louvers that stay closed unless cooling is necessary. The louvers in the Tesla look like they are made by Röchling. They did not reply to my email request for information.
The louver motor controls all seem to have the same three wires. Ground, +14V and data. First I scoped the data signal and found that it looked like diagrams of LIN bus data. Next I hooked up some resistors to protect my trusty Saleae Logic Analyser and downloaded the latest beta code (required for LIN analysis) to my Mac. I love that the Saleae code is multi-platform and works well on the Mac. This confirmed that the protocol is indeed LIN and allowed me to spend some time with paper and a spreadsheet gathering codes and responses from a 30 second snapshot of LIN data from the Tesla. This sort of thing is slow and tedious, the Saleae is not ideal for long data gathering, so the next news came perfectly timed.
Josh at RechargeCar offered up one of his Macchina boards. The Macchina is an Arduino compatible board, very similar to the Mega 2560 with the addition of hardware to run automotive OBD protocols including CAN and K line aka ISO-9141 which seems to be a form of LIN. This is a neat little board that came in very handy, Debbie and I are fans of the Arduino system since it makes simple tasks easy to implement. Although we can code it all the hard way, why bother when the Arduino environment makes simple projects go easily and quickly? You really don’t have to know how to program to get started using Arduino.
Debbie made up some programs (Arduino “sketches”) that manipulated (bit banged) the LIN port initially to send some commands so we could see the louver motor respond. She then modified it to also read back the data from the louver motor. Next she wrote up “sniffer” code to read data on the LIN bus and display it in a easy readable format in our laptops. This made it much easier to see what codes the louver is sending back so we can spoof those.
We’ve (probably) deduced which addresses are used for the missing louvers, and we can only hope that they respond with the same data set as the one motor that we have here. Next up we’ll try to spoof all the louvers and hope that the car likes what we send. We’ll know it worked if the car stops sending louver error codes to Tesla. If that works, we may hook up a set of RC car servos in place of the louvers so we can watch the car cycling them. It’s fortunate for us that the car cycles the lovers on power up. Otherwise it could be a slow process getting the proper codes.
I’m sure that buying a new set of louvers (for $532.40) would have moved things along much faster, but then we would not have learned LIN bus down to the nitty gritty bit level. It’s a good brain workout to try to decode the nibbles and bits of data and lots of fun for people like us!
Fresh 19″ wheels with Michelin tires
ebay taillight
John “Plasma Boy” Wayland and Gaylen at the Tesla Showroom
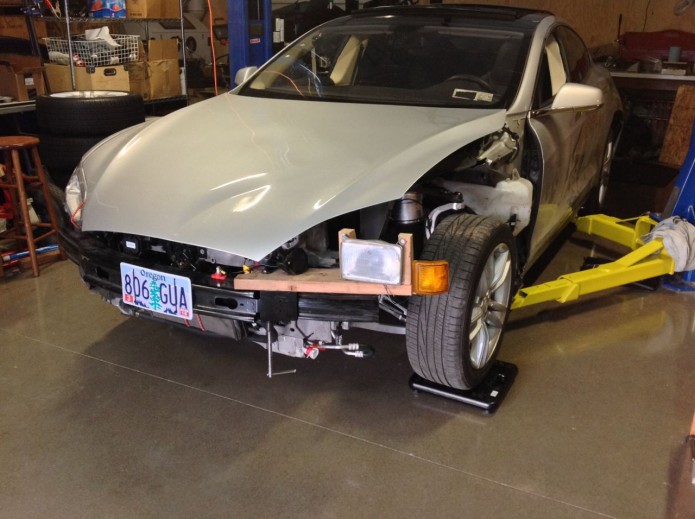
Over the past few weeks I collected more parts, did some “mechanicing” and now the wrecked Model S that I’m calling “the Wreckla” is running around town. It’s not pretty, but it is running pretty well.
While waiting for parts I got one of those random late night urges to work on it and ended up doing some rough body shaping on the left rear corner. My goals were only for the hatch to close, the taillight to point approximately in the right direction and the charge port to fit. I’ve been eyeing the porta-power type jacks at Harbor Freight for weeks, but when it came down to the wire I grabbed the 20 ton jack from my gear press and some handy wood scraps to do the job. Mostly it worked. Of course this sort of work goes much faster when you don’t care about the looks or long term integrity of the car. I still need to do a little more shaping before the charge port fits properly.
The latest suspension parts arrived at the Tesla service center quickly. John “Plasma Boy” Wayland offered to ferry them south from Portland. John and I appreciate any excuse like this one to hang out and plot epic projects. Deb was also here that day we all went out for Chinese food. John tells excellent stories . As usual we all had a great time.
Pretty soon I set aside a little time for good old wrench turning. With such a unique project it feels a bit anticlimactic to do simple parts replacement. There was one unfortunately installed bolt in the lower suspension that made things interesting. It seems that the lower control arm bolt would do better to be inserted from the front in order to avoid having to cut it, or drop the battery pack for control arm replacement. I’m told that engineering at Tesla has been notified of the concern. It feels great to have a car company that responds in a positive way to input from customers! Not having an extra suspension bolt handy, I chose to drop the main pack instead. This had the side benefit of giving me the opportunity to properly install the pack in a way that was safe for driving and was on my to-do list anyway. I replaced the bolt from the front when I put it back together and it’s a good thing I did since shortly after I reinstalled the high voltage battery I discovered I had mounted that suspension arm upside down. With the bolt in the “right” way it was an easy matter to flip it over.
When I tried to install the new fan controller I discovered the studs that hold it to the aluminum frame had both been sheared off. This presented an opportunity to use one of my favorite fasteners, the rivet nut. I love rivnuts for putting threads in sheet metal. They are very handy, especially in automotive modifications. I use the Zink Yellow-Chromate plated steel ones to reduce dissimilar metal effects on aluminum.
The suspension went together smoothly as expected. I chose to replace the hub assembly just in case the bearings were damaged in the accident. I replaced the ride height and wheel speed sensors, bled the brakes and discovered that the front sway bar was bent more than I remembered. I’ll probably want to replace that. I was surprised that I could bend it back into shape at all, but I didn’t move it far enough and having been bent once I no longer trust its integrity.
Once the car was sitting on four wheels again (the first time since the accident!) I worked a bit on ride height and basic alignment. I’ve worked out simple ways to set toe in and camber in the shop (much of that can be done by eye if you know where to look) but caster is something I have not yet set using my simple tools. Maybe I’ll learn to do that on this project since the car is pulling slightly to the right. I think it’s not that important until I get the suspension installed under the Stretch.
Now that it was ready to drive, I needed to quickly get it looking quasi legal since it was Friday and the DMV was about to close for the weekend. So far the Tesla had not complained that I used a Vanagon heater core as it’s “radiator” so I went a bit further and “installed” a Vanagon headlight and turn signal on it. The same douglas fir 2×6 that helped straighten the rear corner was enlisted to support the lighting with the help of a C-clamp. Friends suggested I could finish the humorous look with a log strapped to the front as a bumper extension, but we never got around to that. The trip to the DMV was uneventful. Oregon seems to be one of the more free states in that way. Thier concern was that the VIN and emissions stickers were correct (emission sticker was finally found on the rear hatch) and they seemed uninterested in the lack of front fender or any other safety issues. I hear that some cities in Oregon require fenders, while others do not. That makes sense since many hot rods lack fenders and here in Oregon hot rods are big business.
At this point the ride height was still a bit off, so I spent some time finding the CAN packets that report ride height from the air suspension computer and then adjusted (bent) the old damaged ride height sensor bracket until the four corners were close to the same readings. I have a friend with a very expensive computer interface made for adjusting things like air ride height on luxury cars but unfortunately Tesla is not yet an option on the menus. If any of you happen to know the year make and model of car that also uses air suspension made by Continental, please let me know. I’m wishfully hoping this tool might allow me to properly adjust the ride height if I can figure out what car it should act like while connecting it to the CAN bus that is wired to the air suspension computer. Otherwise, I may run the “Wreckla” up to the Tesla service center to get it calibrated and the codes cleared.
I’ve been collecting a few more parts and tools. I recently won a louver on ebay and expect to get it any day now. Deb and I have paused our LIN work, though it’s very close to the point of testing on the car. I’m unsure if we’ll pursue that or not at this time since the running car is distracting and there are seemingly more important things to fix for now. Maybe I’ll find enough stock louvers so I can use them instead. Ironically I found a set of four air struts for less money that I paid for one new one. I bought them anyway so I’ll have spares in case I blow one out and need a replacement. On the subject of potential overload, I also bought a set of 7000lb car scales so I can keep track of weight budgets along the way.
My next priority is probably to get the cooling system worked out. That means somehow mounting the left AC condenser and charging the system. Then there won’t be much left to fix before I start moving parts to the Vanagon body. Summer is coming up quickly, I want to get some faster progress on the project so I can go camping!